Showing posts with label poodle skirts. Show all posts

Tuesday, 17 December 2013

Poodle finished, so how about a little hat to match

Afternoon internet lovelies

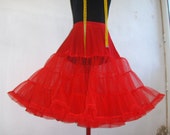
so how do you think I got on with that skirt?


Fairly close to the original I'd say, could have done with bigger pompoms but at least I found some.

So what did I do?

OK I'll tell you.

In the last post you saw me cut the circle part of the skirt and explain why I needed a yoke to make the skirt long enough for my lovely petticoat from Rosy at http://www.sewingadicta.com, don't forget to check her out if you haven't already.

So the yoke, I simply cut a section from the material using a muslin I have for a basic shift dress, (made for that pink dress, but I will post up about that later). I didn't even bother with front and back I just cut the material double folded to give me both sides and adjusted the darts to fit after.
Marking up the darts from the muslin


I added a zip down the right hand side and sewed a straight (rectangular bit of material) waistband on, giving me a perfectly formed but rather short skirt, and amazingly the inner circumference of the circle was the right size to sew straight onto the yoke, no messing, so that bit of maths definitely did the trick.
The hem would have been a bit of a bother being round, so I went for the old trick of using bias tape, a rather nice red with white polka dots. Right sides together open out the lower flap of the tape and line it up with the raw edge of the skirt and straight stitch on. Remember to turn over a hem at the beginning of the tape because once on the wrong side that will be the side of the tape that shows. Once you have done this wrong you will know what I mean, and I still have to think it through each time.


This took a lot of tape, I should have worked out the circumference at an early stage as my guess work meant I had to pop back to the shop for more.
Once sewn on iron the seam, this is a must for all seams in sewing, it fixes the stitches or something like that.Then flip the skirt over and iron the bias tape up over the raw edges, encasing them, and as it is bias tape it will follow the curve automatically, so handy.


Then just sew it down.

Lastly I pinned the trimming in place and sewed on with a zig-zag stitch.


I still need to get a tripod balancing the phone on the stair rail just won't cut it.

oh yes and the hat, well not finished but here's a little preview...


Well till next time, all the best
ally x


Thursday, 12 December 2013

a Christmas poodle skirt

Good Morning All
I hope I find you all in good spirits, it's now less than 2 week till Christmas and the house is starting to feel very festive.  At the weekend we put our tree up, it's a tree I bought in the January sales quite a number of years ago.  It was an absolute bargain, so I got quite carried away and bought it without thinking, it was only when the next Christmas rolled round that we discovered it was way too large for the house we used to live in, (bit like the sofa incident for regular readers).  So up till now we have only put half of it and balanced it by string attached to curtain poles etc.  But this year we have a most resplendent bay window to house it in all it's full glory.  Dr J. was busy with the paintbrush right up till the night before to get the window sills and surrounding areas gleaming white, and here it is, and as is tradition while we decked it I enjoyed a sherry and the kids enjoyed chocolates, (ok I enjoyed chocolates too) so now I really need to get wrapping and get some presents underneath it. Even Jessie is getting feastive:


Ok so the pattern for a poodle skirt is a flat piece of material with circle cut in the centre for the waist and another large circle cut around that for the skirt length.  Please excuse my poor drawing (and the fact it's upside down), but I hope you get the drift.
You fold the material in half and then half again so there are four layers and two sides with folded edges and two sides unfolded.  Then, working out from the corner where the sides with the folded edges join, draw circles.  
Ok first tip at this stage is to make sure the material is facing wrong side out, so when you draw in the wrong place it won't matter.  The corner is the very centre of your circle so taking your waist size as the diameter you want the waistband to be, you work out what the radius of that circle would be ie:
for a 30 inch waist (I wish) 

30 / 3.14 = 9.55

then to get the radius

9.55 / 2 = 4.77


Attach a piece of string to a pencil, hold round a pin at the corner, allowing the pencil to swing round on that radius and draw a arc on the material.


Tip 2, mark a small dot at the beginning of the arc and the end using a ruler to make the sure the thread doesn't lengthen or shorten and you draw an even circle.  Also remember about the seam allowance for your waistband, the circle needs to be smaller to account for that.
Tip 3, don't forget if you start in inches stay in inches, this one almost got me this time.

Now once you have your waist drawn you can think about the length of the skirt, simply how ever long you want the skirt add this on to the waist radius and draw another arc using the string method again.
This is where I ran into problems you see the skirt has to be a certain length to make sure it is as long as the petticoat, see my last post for more about that, but I didn't have enough width of material to do it. My material just wasn't wide enough, I mean it was 60 inches, but this just wasn't enough, so followed a bit of head scratching, and me folding the material lots of different ways, trying to see if I could cut 2 semi circles and stitch them together, but in the end I decided to go for a yoke, so the centre "waist" measurement in my case is in fact my hip measurement ,and with the leftover material I will make a waistband and fitted yoke.

 Tip 4, cut carefully, if you're lazy like me and don't pin the pieces together, or a better tip, pin the pieces so they don't slip as you cut.
And don't forget the old mantra, measure twice, cut once.


Well sewing it all together will have to wait now, as the skirt is not needed till next week and I have an outfit to finish for this weekend. This beautiful dress is only a 24 inch waist, and so delicate that the seams rip open just by pulling, so even if anyone fitted it I wouldn't recommend wearing it. So I am remaking it with new pink material, in my size and sewing the black velvet embroidered panel back on. 

Got my work cut out so I best be on with it.

warmest regards
ally x

Monday, 9 December 2013

petticoats and bullet bras


good morning lovely people,

Hand made PetticoatAs you are most probably aware the world of internet blogging is full of kind and extremely generous people who run giveaways and competitions for all sorts of reasons, and some just cause they can. Well one such wonderful lady is Rosy, sewingadicta.com.  For her birthday this year she ran a giveaway for a petticoat and I won.  How lucky and as if this wasn't enough she didn't just send one over she had lying about she asked for my measurements and even what colour I wanted, I went for red, and shortly after it winging it's way over from Spain, it arrived and I was delighted, believe me it fits like a dream.  But when you see what this lady sews you won't be surprised.  I can't urge you enough to take a wander over to her blog page and look down the right hand side.  She makes reproductions of dresses and outfits from the TV series like Mad Men and New Girl, all sorts of films, and they are great. You give her a picture and she can make it, she is very talented.  As I said she is Spanish, but as she is such a lovely person she writes her blogs in English as well as Spanish, which is great for the likes of me who weren't so good at languages at school. Also she has an Etsy shop so if you want a petticoat of your own, you can have one, or a custom made dress.  Go on now click the link and have a look.


http://www.sewingadicta.com

Well with a lovely new red petticoat, I obviously need a new poodle skirt and in time for Christmas too, I think.
Whilst browsing through the blogs I like I came upon this picture and knew instantly that I needed the white skirt with red trim at the back to go with my red petticoat. Perfect don't you think. The picture was on the vintage pattern files blog, and if you don't follow it I urge you to take a look at that too, as it is full of free, yes FREE, wonderful patterns for sewing, knitting, crocheting, anything vintage really.

This post has a link to Technicolour Cutie for a way of working out the cutting pattern for the a circle skirt, which involves a bit of a throw back to school days, do you remember pie: 3.14 ish.

Basically you take the waist divide by pie to get diameter and the half to get radius, but it does come with the excellent advice of cutting small first as you can always cut bigger later, but not the other way round.  If none of this makes sense, I will be getting my white material by Thursday, so Thursday's blog will be showing you step by step how to make a circle skirt. If you can't wait go take a look there's a lot more detail in the blog link, I only copied a small section.

http://thevintagepatternfiles.blogspot.co.uk/2013/12/1950s-sewing-felt-circle-skirt-tutorial.html


Measurements

Waist divided by 3.14 = Diameter

Then Diameter divided by 2


Length: Measure your waist to desired length. You can measure your favorite skirt or dress under the waistband to the hem.


When in doubt cut smaller first. You can always go back and make the waist larger.


I don't know about you but I'm excited about it.

But other news, plastic is not strong! I know this as the hook I used on my bullet bra broke the other day, whilst I was wearing it! I bent down and ping! Fortunately I hadn't left the house yet and was able to change. This is useful really, as any problems with these bras needs to be with me not my customers, so I really do need to test these things out first.
There is limited give in a vintage bra, powernet had not been invented then, that's the stretchy stuff used in modern underwear, so the hook holding the bra together, and I want to use a hook rather than the modern hooks and eyes we have now, needs to be strong, and my plastic one only lasted about a month.  I'm just glad I found out before I made a load.

Anyway after a fairly intensive internet trawl to find something that was still fairly cheap in the postage departed I have found some metal covered with plastic hooks, so they should be strong and still comfortable.  I am still waiting for them to arrive though so I can't really update any more than that, but I think it's probably enough for a monday morning, there's a hat and bag set calling me now that I would really like to get finished today, so I'm off for now, don't forget poodle skirts on Thursday.  Just how kitch can I make it with my daughter still being willing to stand next to me???  Well I can always wear it when she is not around.

love and hugs
ally x