Showing posts with label bullet bras. Show all posts

Friday, 19 September 2014

corselet part 2

Good Morning all,

Here is the latest catch up on how I'm getting on with trying to make control undies. I have to say that corsets are much easier to fathom without all this stretch business. You just sew your seams up and then control the amount of pull in with how tight you pull your laces, easy.

Monday, 24 March 2014

Monday Morning post and vintage bras are back on the agenda.

Morning all, or afternoon depending on when or where you reading this.

Graph of most popular countries among blog viewers
All time highest viewing areas
I was looking over my readers map this morning and I am always quite astonished there are people from all over the world and not just the english speaking bit, so I would like to say a sorry that I am only capable of producing blog posts in English.  There are some blogs out there I read that are written in two languages which I think is so cool.  I was never much good at languages at school, having the kind of mind that does maths, which is a great help when it comes to pattern drafting, so I'm not complaining. But I do try whenever I go abroad to master some basics to be polite, they just never seem to stick for long.
Graph of most popular countries among blog viewers
this months readers main locations

The figures that blogger produce only show the top 10 areas for now, that day, that week, that month or all time, so some days I can see a reader will pop up from Nigeria, Angola or anywhere really, but as these are less frequent they don't make it up to the monthly or all time figures. This is what all time looks like at the moment, mainly England, which I believe is a lot to do with my lovely friends who have been reading my posts for the start, but I don't have that many friends and with all the other places too, I do feel very blessed that my readers are growing every week and many do seem to be returning.

EntryPage Views
United Kingdom
2982
United States
1631
Russia
112
Germany
107
Canada
76
Spain
53
Netherlands
43
New Zealand
40
France
37
Australia
32

So anyway I just wanted to say wherever you are thank you for reading and I hope you enjoy my blog and return in the future.

Well some of you who do read on a regular basis may have noticed that something was missing around the 15th March.  My entry into the historical fortnightly sewing challenge and yes you would be right.  I was just too busy to get it done what with commissions and the EvaDress.com competition.  It should have been #5 Bodice. Well I decided that it wasn't worth rushing it, and I have a plan to catch up.  You see challenge number 8 is UFOs & PHDs: "Use this opportunity to finish off something that’s never quite gotten done, or stalled halfway through".
This is just what I need, due on 1st May, I can use this to complete my bodice, a victorian ball gown pattern I've had sitting around the house for quite a long time now, and I have to say I am fairly please with the way it looks even in pieces, but I will save all that for when it's completed for challenge 8.

Today though is back to the bras and I am experimenting with different fabrics to find the best for hold, none stretch and pleasant to wear, etc, as well as trying to get them to look a little bit prettier that just plain cotton.
The white is a definite improvement on the black, but still needs something more, a little bow or flower maybe.

 Well best be off and at it.

Hugs and Kisses

Ally

Monday, 9 December 2013

petticoats and bullet bras


good morning lovely people,
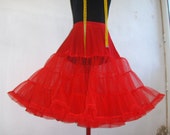
Hand made PetticoatAs you are most probably aware the world of internet blogging is full of kind and extremely generous people who run giveaways and competitions for all sorts of reasons, and some just cause they can. Well one such wonderful lady is Rosy, sewingadicta.com.  For her birthday this year she ran a giveaway for a petticoat and I won.  How lucky and as if this wasn't enough she didn't just send one over she had lying about she asked for my measurements and even what colour I wanted, I went for red, and shortly after it winging it's way over from Spain, it arrived and I was delighted, believe me it fits like a dream.  But when you see what this lady sews you won't be surprised.  I can't urge you enough to take a wander over to her blog page and look down the right hand side.  She makes reproductions of dresses and outfits from the TV series like Mad Men and New Girl, all sorts of films, and they are great. You give her a picture and she can make it, she is very talented.  As I said she is Spanish, but as she is such a lovely person she writes her blogs in English as well as Spanish, which is great for the likes of me who weren't so good at languages at school. Also she has an Etsy shop so if you want a petticoat of your own, you can have one, or a custom made dress.  Go on now click the link and have a look.


http://www.sewingadicta.com

Well with a lovely new red petticoat, I obviously need a new poodle skirt and in time for Christmas too, I think.
Whilst browsing through the blogs I like I came upon this picture and knew instantly that I needed the white skirt with red trim at the back to go with my red petticoat. Perfect don't you think. The picture was on the vintage pattern files blog, and if you don't follow it I urge you to take a look at that too, as it is full of free, yes FREE, wonderful patterns for sewing, knitting, crocheting, anything vintage really.

This post has a link to Technicolour Cutie for a way of working out the cutting pattern for the a circle skirt, which involves a bit of a throw back to school days, do you remember pie: 3.14 ish.

Basically you take the waist divide by pie to get diameter and the half to get radius, but it does come with the excellent advice of cutting small first as you can always cut bigger later, but not the other way round.  If none of this makes sense, I will be getting my white material by Thursday, so Thursday's blog will be showing you step by step how to make a circle skirt. If you can't wait go take a look there's a lot more detail in the blog link, I only copied a small section.

http://thevintagepatternfiles.blogspot.co.uk/2013/12/1950s-sewing-felt-circle-skirt-tutorial.html


Measurements

Waist divided by 3.14 = Diameter

Then Diameter divided by 2


Length: Measure your waist to desired length. You can measure your favorite skirt or dress under the waistband to the hem.


When in doubt cut smaller first. You can always go back and make the waist larger.


I don't know about you but I'm excited about it.

But other news, plastic is not strong! I know this as the hook I used on my bullet bra broke the other day, whilst I was wearing it! I bent down and ping! Fortunately I hadn't left the house yet and was able to change. This is useful really, as any problems with these bras needs to be with me not my customers, so I really do need to test these things out first.
There is limited give in a vintage bra, powernet had not been invented then, that's the stretchy stuff used in modern underwear, so the hook holding the bra together, and I want to use a hook rather than the modern hooks and eyes we have now, needs to be strong, and my plastic one only lasted about a month.  I'm just glad I found out before I made a load.

Anyway after a fairly intensive internet trawl to find something that was still fairly cheap in the postage departed I have found some metal covered with plastic hooks, so they should be strong and still comfortable.  I am still waiting for them to arrive though so I can't really update any more than that, but I think it's probably enough for a monday morning, there's a hat and bag set calling me now that I would really like to get finished today, so I'm off for now, don't forget poodle skirts on Thursday.  Just how kitch can I make it with my daughter still being willing to stand next to me???  Well I can always wear it when she is not around.

love and hugs
ally x


Wednesday, 30 October 2013

back to the bras

Hello all

bet you were thinking I'd forgotten about bras once I had a wearable model. Well not so, one of the big things I want to be able to provide in my virtual shop is made-to-measure reproduction vintage bras, so I have been beavering away at this, in the background so to speak, but I thought today I would just update you as to how I'm getting on.

Ok I have these photos, but I want to apologise for the quality of the front facing camera bit on my phone, it's not so good and my arms aren't so long and the button is in a really awkward place, that if you miss it by the slightest amount you end up going back to the home page.  It can be very frustrating, and one thing I do plan to get for myself is a better camera and a tripod. But for now we will have to make do with what we have got.

So anyway, I have these photos to hopefully show you the difference in bust shapes with the different bras: 1 modern, 1 bullet and 1 circle and spoke.  I aim to have both bullet and circle and spoke in the shop as they are quite different looks.  I wore a close fitting 50s jumper so hopefully it will give the right feel.

Modern Bra
With a modern bra you don't get the same lift and the space between your waist and the start of your bust is smaller, this has quite a detrimental effect on vintage clothes. Vintage trousers and skirts are higher waisted, that is they that actually come up to your waist rather than your hips. As these shots are really only of the bust area you don't get to see this properly, but once I have the camera situation, or a willing model, sorted I hope demonstrate better.


Having just looked at these photos you can actually see that in these shots my elbow joint is less visable showing there is less lift.
Bullet Bra

 Better lift and with this pattern not highly pointed, I think I will try another shot (pardon the pun) at this. The other problem I have with these is that this is a wired bra and I really was hoping to move away from wires, I personally find them quite uncomfortable and they always fall apart in the washing machine. So the next thing to do with the bullet bra is re-draft for no wires and a bit more point, although as a first gander into vintage bras it's not a bad starting point, as an extreme point can be a foreign to start, as I'm sure a lot of vintage wears out there will agree.


Circle and Spoke
much more lift, highest elbow show and quite a point. I love this bra and have been wearing it loads, it improves the fit of my vintage and reproduction clothes no end. And it's comfortable no wire problems, I can't understand why we stopped wearing them.


So that's where I'm at, almost at the stage of putting these up in my shop.  I have just to decide the best way of getting girls to measure exactly where I want them to, as the whole point to a custom made fitted bra is that is fits beautifully.

So I will want to make sure those measurements are spot on.

On other news here's a bit of embroidery for the crown of a hat. I do hope a certain young lady likes it and that we are both of the same thought on colour, sometimes one interpretation can be quite different from the next person, and it's hard to show the exact colour on the internet.

Well bye bye for now,
hug and all that
ally x x

Monday, 7 October 2013

getting dizzy with all these circles

Hello everyone.

Hope you all had a splendid weekend, I just wish they weren't over so quickly.

Firstly and just quickly, please, please nominate me.

Craftsy.com are having their first blogger awards and it would be great to make it in. The link is at the top of the side bar, and sewing is probably the best category match.  Thank you so much.

Secondly, more circles on the bra helped, but there is still just too much spare material at the end there.

 So definitely need to try with less point and more curve at the end of the point of bust as the professional call it.

But the bullet bra has been drafted and test built, cups anyway.  The problem with all these bras is it is just impossible to try them on to test for size etc without finishing them, ie the cups need to be held on in some way, so they look good, but I can't really say for sure.  One thing that is certain is there is less of a point at the end, they are more the shape of the end of a bullet.
 The stitching has to be spirals going in opposite direction to each other on each side, does that make sense? Hence the diagram below, must admit it took me awhile to get my head round which way to turn each one when sewing, but on the whole I was very pleased with the sewing, quite neat for a first attempt.


So here they are just waiting for sides, a back and straps, might have chance for that tomorrow. Just as a reminder all this bra stuff has come about because of foundations revealed, which there is a link down the side for, I love that website.  It's not my genius I'm just following well written instructions.

Well till next time, ohh and please if you get a moment nominate me for the craftsy awards, thank you. double ohh and also comments, don't be afraid to leave them, it's lovely to hear from you. I read them all.

warmest regards ally x

Wednesday, 2 October 2013

ironing milk bottles, but I won't do socks.

Morning fellow internet users

Things to share today, you can iron milk bottoms.  This really isn't as daft as it first sounds, you see I have been looking at different options for reinforcing the bottom of bags.  This is usually a strip of hard cardboard in purchased bags and this is all well and good when the bag is made from a fabric that is sort of waterproof, but all the bags I make are from fabrics that are not waterproof i.e. felt or velvet.  A felt bag put down in a puddle of beer will soak it up and the cardboard will become wet, soggy and not hold the bag in a nice firm shape, trust me on this one, I know. Now I not advocating that anyone purchasing my bags should keep them in puddles, but what I have been looking for is something waterproof like plastic, just in case.

Small bags are less of a problem as there are a number of things out there that can be used, ice cream tubs, not the small cardboard ones, but the larger square ones, nice large clothes conditioner bottles can be used for a fair size oval, just wander round the kitchen and take a look. Yesterday though whilst swilling out a milk bottle for putting in the recycling, it struck me that around the waist area if flatten out was a good size rectangle. I got out the scissors and set to work, my first thought was that if I stuck two together both having bending sides facing in, they might hold each other flat, then I thought about the iron; warm and melt just enough to flatten and hey presto it worked.  We used the iron alot when I did a city and guilds in machine embroidery, you should see how a crisp packet reacts, it's great fun.


And a second momentous moment yesterday came when after I had spent quite awhile trying to work out how far I would have to travel to buy some really thin dowels for reinforcing the top of this particular bag, when I remembered the bamboo skewers we use for BBQing. Cut to size they were perfect. So all in all I was quite pleased with myself yesterday.


Well today's post was supposed to be about bra progress, so here's a quick synopsis:


just love the 50's style fastening 
I think the point on the circle and spoke bra is still too pointy as you end up with a shape that you just can't get a human boob into believe me. It kinda gets a bit wider after the circles, sorry I know that that is difficult to see with satin material. Options would be to take the curve down and reduce the point or increase the circles inwards as the circles, since this particular bra is already made up I decided it would be easier in this case to add a few more circles and see what happens....


Haven't done it yet hence the dot, dot, dot, but it is on the list for soon, as is the other option of less point, so I can compare the two and I also have the drafts for the 4 piece pattern for the bullet bra, so next week will see that in material form too.

All in all, quite please with progress this week, hope you are all having a good week too.

warmest regards
ally x

Monday, 30 September 2013

Fall for cotton - and we're finished

Morning folks,

well would you believe it the end of September is here, I know everyone says the same, but I really can't believe how fast this month has gone by.  I've had a lovely month and I hope all you have too, although I had a bit of a cold for some of it, you know the sort that just hard to shift, but it didn't stop me getting on with stuff and doing most of what I wanted to do.

When you stop and look back and think what have I done this month it's hard to remember everything. Sometimes I find it hard to remember what I had for tea yesterday.  I do know what I had yesterday at the moment, it was fish and chips, we don't often have this but it was a treat, as myself and the Dr were out at a tea dance all afternoon and had no time to cook.  It was a delightful tea dance, and the weather was so good that we cycled over to it. Numerous people we chatted to, who we hadn't seen for awhile, asked, as you do, 'so what have you been up to?' and I found it quite hard to remember much.  I know we haven't danced as much as we would have liked and the DIY hasn't progressed as much as it could have, but we haven't been lazy or killing ourselves overdoing it either. Last winter and spring we work at it so hard that we were both exhausted come summer, so we have now taken a policy of pottering pace, the house is more than liveable and the rest will be done eventually.

Well with the end of September comes the end of the fall for cotton challenge and so I present to you my finished blouse. First though a couple of thoughts and notes about the progress.

 I miss measured on the bust area and had to add a small extension under the arms, with the pattern as it was this wasn't too bad and really isn't noticeable in the finished garment.
 
I covered the seam down the front facing with bias binding to as I just really loved the flowery bias tape, and obviously ran it around the hem. As the hem was a curve I decided very early on to hem with tape rather than try to do it normally, but I have to say that this material was just a dream. I sewed the tape on then ironed it up expecting to have to work in the excess material somewhat, but it just seem to fit straight off, one of the easiest hems I have ever done.


I made shoulder pads out of wadding cutting two different sized semi circles and covered them with the cream material, so that they wont show at all.


Choosing buttons, I wanted something different as the blouse was quite plain I thought the buttons should be a little special. 
 And I added 4 down the front rather than the three on the pattern, less likelihood of gapping round the boob around.


Well here it is and I couldn't be bothered with my hair so I popped a hat on for the photos.

Well I hope you like it, and as a side issue the blouse falls as it should due to correct underpinning, yes I finished the circle and spoke bra and even wore it out to the dance yesterday, where it withstood all the dancing and cycling and was very comfy.  I'll write more about that on Wednesday though, but don't you love the colour.

take care honeys
love ally x